Agricultural Literacy Curriculum Matrix
Lesson Plan
Inside the Egg, Hatching Chicks (Grades K-2)
Grade Level
Purpose
Students investigate embryo development in chicken eggs. Grades K-2
Estimated Time
Materials Needed
Engage:
Activity 1: Candling an Egg
- Fertile eggs
- Information on sourcing fertile eggs can be found in the Hatching Science Center
- Modeling clay
- 1 high-intensity LED flashlight (e.g., 6" Mini Maglite)
Activity 2: Inside the Egg, Embryo Development Wheel
- A Chick Hatches—Embryo Development Wheel activity sheet, 1 per student
- Scissors
- Glue
- Crayons or colored pencils
- Large paper plates, 2 per student
- Metal craft brads, 1 per student
Vocabulary
embryology: the study of embryos (unborn human or animal in the earliest stages of growth when its basic structures are being formed) and their development
hen: an adult female chicken
rooster: an adult male chicken of breeding age
Did You Know?
- Eggs are the least expensive source of high-quality protein for our diets.
- Eggs have 6 grams of protein and only 70 calories.
- Most laying hens in the U.S. are Single-Comb White Leghorns.
- The U.S. produces about 75 billion eggs a year, which is 10% of the world supply.
- There are 7-17 thousand tiny pores on the egg shell surface.
- Some hen breeds can lay up to 300 eggs per year.
Background Agricultural Connections
Embryology is the science that deals with the growth and development of an embryo. All birds lay eggs, which provide protection and nutrition for the developing embryo. Most people are familiar with chicken eggs because they are commonly found in our kitchens. Watching a fertile chicken egg develop can be an effective way to study embryology, investigate how organisms change and develop over time, and increase excitement and teamwork in the classroom.
Chickens are important farm animals for the production of meat and eggs. The breeds of chickens used for egg production have been developed through careful selection and crossbreeding to increase the number of eggs a hen will lay in a year. Hens that have not mated with a rooster will still lay eggs. These eggs have not been fertilized. They are not fertile and will not become embryos. Eggs sold in the grocery store are infertile.
A rooster mates with and fertilizes a hen’s egg before the hen lays the familiar hard-shelled egg. Under the right conditions, each fertilized egg will grow to be a chick. The yolk and albumen (the white of the egg) provide food for the growing embryo. The albumen also provides the embryo with protection against shock, cushioning the developing embryo in a water sac. The blunt end of the egg contains the air cell. Just before the chick breaks out of its shell, it takes its first breath of air from this air cell.
The egg provides much of what the developing embryo needs—food to grow, cushion from shock, and air to breathe. In mammals, the embryo develops inside of the mother’s body, which provides nourishment and protection. If birds grew heavy during pregnancy like mammals, it could inhibit their ability to fly. The main disadvantage to laying eggs is that they’re good to eat and vulnerable to prey. Although the egg provides energy and protection, the parent (the hen in the case of chickens) is still needed to keep the eggs warm and protect them from predators.
Eggs can be incubated in two different ways—by a broody hen or by an incubator. In the classroom, the incubator is the preferred method. There are two main types of incubators, still-air and forced-draft. Both types can be used in a classroom setting, although the forced-draft type is most common. Successful egg hatching requires maintaining optimal temperature, humidity, and ventilation, as well as regular egg rotation. These conditions can easily be met with proper use of an incubator.
Candling eggs is a simple and effective way to show students that there is life inside the eggshell. In a dark room, shining a bright light through the shell of a fertile egg will silhouette the developing embryo. After four days a heartbeat can be observed, and just a few days later the wings, legs, and a beak can be distinguished.
Engage
- Use one of the four virtual field trips created by The American Egg Board and Discovery Education to introduce the topic and create student interest in the production of eggs.
Explore and Explain
Activity 1: Candling an Egg
- If you have eggs with white shells, they can be candled around the fourth day of the incubation cycle. Dark-shelled eggs may be difficult to see through and will give better results after about a week. Dirt on the shells can be brushed away. Do not wash the eggs with water - washing destroys the protective coating that prevents bacteria from entering the shell.
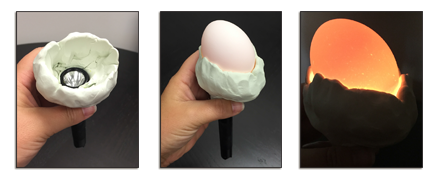
- It is not necessary to purchase an expensive egg candler. An effective candler can be made using a high-intensity LED flashlight and modeling clay. Wrap the clay around the top of the flashlight to create a nest for the egg. The clay will seal between the flashlight and the egg and will focus the light through the egg.
- Carefully hold an egg's wide end in the center of the opening directly over the beam of light (so that the entire oval is illuminated). You may need to dim or turn off any outside lighting to candle the eggs. Remember to be extremely careful with the eggs; even small cracks can inhibit successful hatching.
- In a fertile egg, there will be a fine network of veins running out from a dark center. Eggs with no visible embryonic development are infertile, while an egg with a few small blood spots is a fertilized egg in which the embryo has died. Photos and videos of candling eggs at different stages of incubation can be viewed at backyardchickens.com.
- Discuss the changes that the embryo will go through and the nature of living things using the following questions:
- Which is the living thing-the eggshell or the embryo? Why is the embryo alive? What are the characteristics of a living thing?
- What does the egg need from the hen? Could the egg hatch on its own without the help of a hen or human (like in the incubator)? How is this similar to a child's reliance on their parents? Do plants require a parent to take care of them?
- How are plants and animals similar? How are they different? How do plants and animals differ from rocks and other non-living things?
- Ask the students to list things that will need to be done in order to hatch the chicks and/or take care of them after they hatch (put water in the incubator, watch the temperature in the incubator, rotate the eggs, provide clean water, provide food, keep them warm). Explain to the students that these are the things a hen would do to care for her eggs.
- Have the students list the needs of a baby or child? How does an adult know how to care for a baby or child? Explain to the students that people, animals, and plants are all living things that use energy to grow, develop, and reproduce.
Activity 2: Inside the Egg, Embryo Development Wheel
- Give each student a copy of the activity sheet A Chick Hatches—Embryo Development Wheel and two paper plates.
- Instruct them to color the activity sheet and cut along the dashed lines as indicated on the page.
- Next, students should glue the square titled “A Chick Hatches” with the picture of a fully developed chick in the center of one of the paper plates. Tell the students to write their names below the square. This will be the development wheel cover.
- Instruct the students to put the remaining stages of development in numerical order according to the day (indicated by the number in the egg on the upper left side). Then, paste the stages of development in order around the edge of the second paper plate.
- Have the students cut a three-sided window just below their name on the previous plate (the development wheel cover). Lay this plate over top of the one that has the development stages pasted around the outer edge. The cut-out window should be large enough that one development stage picture can be seen through it.
- Finally, place a metal brad through the center of both paper plates so that a rotating storyteller is formed. Divide the students into pairs and have them share their development story wheels.
Elaborate
-
Give the students a writing prompt that involves a baby chick in its first day of its life cycle. For example: Today, I hatched from my shell and my day was filled with _________________________________.
-
Read the book Chicks and Chickens written by Gail Gibbons to your class.
-
Use the hands-on activities in the lesson plan From Chicken Little to Chicken Big to explore the production of chicken and eggs for food and teach students about the life cycle and genetics of chickens.
-
Refer to the Hatching Science Center and the Classroom Hatching Program for detailed information about hatching chicks in the classroom.
Evaluate
After conducting these activities, review and summarize the following key concepts:
- Chickens are raised for the eggs hens produce as well as for meat.
- All chickens begin their life by developing inside an egg.
- A healthy chick grows inside an egg that is kept at the proper temperature and humidity. Developing chicks also need nourishment which they receive from the yolk inside the egg.
Sources
- http://www.incredibleegg.org/egg-nutrition/
- http://educationstation.discoveryeducation.com/field-trips/pearl-valley-farms
Recommended Companion Resources
- All About Eggs
- Chick Embryology YouTube Playlist
- Chick Life Cycle
- Chicken Embryo Development
- Chicken Genetics Matching Cards
- Chickenology
- Chicks & Chickens
- Classroom Hatching
- Countdown to Hatch
- Daisy Comes Home
- Farm Animals: Chickens
- Hatching Chicks in Room 6
- Hatching Science Center
- Hatching Science: 21 Days of Discovery Video
- Inside An Egg
- Livestock Cards
- One Egg
- One Hen: How One Small Loan Made a Big Difference
- Poppy's Chicks (Farm Friends)
- Poultry Reader
- Sonya's Chickens
- The Chicken-Chasing Queen of Lamar County
- The Life Cycle of a Chicken
- Tillie Lays an Egg
- Virtual Chicken
- Virtual Egg Farm Field Trips
- Zinnia and Dot
Author
Organization
 |
We welcome your feedback! If you have a question about this lesson or would like to report a broken link, please send us an email at matrixelearning@gmail.com. If you have used this lesson and are willing to share your experience, we will provide you with a coupon code for 10% off your next purchase at AgClassroomStore. |